728x90
우분투에 qos mod를 설치하고 설정하는 방법(mod_qos)
mod_qos는 Apache 웹 서버에서 품질 서비스(QoS)를 제공하는 모듈로 대역폭 제어, 연결 수 제한, 요청 속도 제한 등 다양한 기능을 제공합니다.
- APT 저장소 업데이트
sudo apt-get update- Apache 설치
sudo apt-get install -y apache2/usr/sbin/apache2 -v$ /usr/sbin/apache2 -v
Server version: Apache/2.4.52 (Ubuntu)
Server built: 2023-10-26T13:44:44- mod_qos를 컴파일하여 설치하기
더보기
---
sudo apt-get install -y apache2 apache2-dev build-essential libtoolmod_qos 소스 코드 다운로드
git clone https://github.com/apache/httpd.gitmod_qos 컴파일 및 설치
- mod_qos 모듈을 Apache 웹 서버의 소스 코드와 함께 컴파일하고 설치합니다.
cd httpd./buildconf./configure --enable-modules=most --enable-mods-shared=allsudo make installApache 설정 수정
- Apache의 설정 파일(httpd.conf 또는 /etc/apache2/apache2.conf)을 열고 mod_qos 모듈을 활성화합니다.
echo "LoadModule qos_module /usr/lib/apache2/modules/mod_qos.so" >> /etc/apache2/apache2.conf---
1. mod-qos(libapache2-mod-qos) 설치
sudo apt search apache2-mod-qos$ sudo apt search apache2-mod-qos
Sorting... Done
Full Text Search... Done
libapache2-mod-qos/jammy 11.63-1build1 amd64
quality of service module for the apache2sudo apt info libapache2-mod-qos$ sudo apt info libapache2-mod-qos
Package: libapache2-mod-qos
Version: 11.63-1build1
Priority: extra
Section: universe/httpd
Origin: Ubuntu
Maintainer: Ubuntu Developers <ubuntu-devel-discuss@lists.ubuntu.com>
Original-Maintainer: Sergey B Kirpichev <skirpichev@gmail.com>
Bugs: https://bugs.launchpad.net/ubuntu/+filebug
Installed-Size: 807 kB
Depends: libapr1 (>= 1.2.7), libaprutil1 (>= 1.2.7+dfsg), libc6 (>= 2.34), libpcre3, libpng16-16 (>= 1.6.2-1), libssl3 (>= 3.0.0~~alpha1), zlib1g (>= 1:1.1.4), apache2-api-20120211, apache2-bin (>= 2.4.16)
Homepage: http://mod-qos.sourceforge.net/
Download-Size: 226 kB
APT-Sources: http://kr.archive.ubuntu.com/ubuntu jammy/universe amd64 Packages
Description: quality of service module for the apache2
This is a quality of service module (QoS) for the Apache web server
implementing control mechanisms that can provide different priority
to different HTTP requests.
.
It may be used to determine which requests should be served and which
shouldn't in order to avoid resource oversubscription. The module
collects different attributes such as the request URL, HTTP request
and response headers, the IP source address, the HTTP response code,
history data (user session and on per source IP address basis), the
number of concurrent requests to the server (total or requests having
similar attributes), the number of concurrent TCP connections (total
or from a single source IP), and so forth.
.
Counteractive measures to enforce the defined rules are: request
blocking, dynamic timeout adjustment, request delay, response
throttling, and dropping of TCP connections.sudo apt-get install -y libapache2-mod-qos2. mod_qos 모듈 활성화
mod_qos 모듈을 Apache에 활성화해야 합니다.
sudo a2enmod qos$ sudo a2enmod qos
Module qos already enabled- Apache 모듈 목록
ls -l /etc/apache2/mods-enabled$ ls -l /etc/apache2/mods-enabled
total 0
lrwxrwxrwx 1 root root 36 Feb 26 14:26 access_compat.load -> ../mods-available/access_compat.load
lrwxrwxrwx 1 root root 28 Feb 26 14:26 alias.conf -> ../mods-available/alias.conf
lrwxrwxrwx 1 root root 28 Feb 26 14:26 alias.load -> ../mods-available/alias.load
lrwxrwxrwx 1 root root 33 Feb 26 14:26 auth_basic.load -> ../mods-available/auth_basic.load
lrwxrwxrwx 1 root root 33 Feb 26 14:26 authn_core.load -> ../mods-available/authn_core.load
lrwxrwxrwx 1 root root 33 Feb 26 14:26 authn_file.load -> ../mods-available/authn_file.load
lrwxrwxrwx 1 root root 33 Feb 26 14:26 authz_core.load -> ../mods-available/authz_core.load
lrwxrwxrwx 1 root root 33 Feb 26 14:26 authz_host.load -> ../mods-available/authz_host.load
lrwxrwxrwx 1 root root 33 Feb 26 14:26 authz_user.load -> ../mods-available/authz_user.load
lrwxrwxrwx 1 root root 32 Feb 26 14:26 autoindex.conf -> ../mods-available/autoindex.conf
lrwxrwxrwx 1 root root 32 Feb 26 14:26 autoindex.load -> ../mods-available/autoindex.load
lrwxrwxrwx 1 root root 30 Feb 26 14:26 deflate.conf -> ../mods-available/deflate.conf
lrwxrwxrwx 1 root root 30 Feb 26 14:26 deflate.load -> ../mods-available/deflate.load
lrwxrwxrwx 1 root root 26 Feb 26 14:26 dir.conf -> ../mods-available/dir.conf
lrwxrwxrwx 1 root root 26 Feb 26 14:26 dir.load -> ../mods-available/dir.load
lrwxrwxrwx 1 root root 26 Feb 26 14:26 env.load -> ../mods-available/env.load
lrwxrwxrwx 1 root root 29 Feb 26 14:26 filter.load -> ../mods-available/filter.load
lrwxrwxrwx 1 root root 27 Feb 26 14:26 mime.conf -> ../mods-available/mime.conf
lrwxrwxrwx 1 root root 27 Feb 26 14:26 mime.load -> ../mods-available/mime.load
lrwxrwxrwx 1 root root 32 Feb 26 14:26 mpm_event.conf -> ../mods-available/mpm_event.conf
lrwxrwxrwx 1 root root 32 Feb 26 14:26 mpm_event.load -> ../mods-available/mpm_event.load
lrwxrwxrwx 1 root root 34 Feb 26 14:26 negotiation.conf -> ../mods-available/negotiation.conf
lrwxrwxrwx 1 root root 34 Feb 26 14:26 negotiation.load -> ../mods-available/negotiation.load
lrwxrwxrwx 1 root root 26 Feb 26 14:29 qos.conf -> ../mods-available/qos.conf
lrwxrwxrwx 1 root root 26 Feb 26 14:29 qos.load -> ../mods-available/qos.load
lrwxrwxrwx 1 root root 33 Feb 26 14:26 reqtimeout.conf -> ../mods-available/reqtimeout.conf
lrwxrwxrwx 1 root root 33 Feb 26 14:26 reqtimeout.load -> ../mods-available/reqtimeout.load
lrwxrwxrwx 1 root root 31 Feb 26 14:26 setenvif.conf -> ../mods-available/setenvif.conf
lrwxrwxrwx 1 root root 31 Feb 26 14:26 setenvif.load -> ../mods-available/setenvif.load
lrwxrwxrwx 1 root root 29 Feb 26 14:26 status.conf -> ../mods-available/status.conf
lrwxrwxrwx 1 root root 29 Feb 26 14:26 status.load -> ../mods-available/status.load3. Apache 서비스 재시작
설정을 적용하기 위해 Apache 서비스를 재시작합니다.
sudo systemctl restart apache2728x90
4. mod_qos 설정 파일 확인
mod_qos는 /etc/apache2/apache2.conf 파일에서 설정됩니다. 원하는 대로 요청 속도 제한 및 기타 제어를 구성할 수 있습니다.
- qos.load 파일
sudo cat /etc/apache2/mods-available/qos.load$ sudo cat /etc/apache2/mods-available/qos.load
LoadModule qos_module /usr/lib/apache2/modules/mod_qos.so- qos.conf 파일
sudo cata /etc/apache2/mods-available/qos.conf$ sudo cat /etc/apache2/mods-available/qos.conf
<IfModule qos_module>
# minimum request rate (bytes/sec at request reading):
#QS_SrvRequestRate 120
# limits the connections for this virtual host:
#QS_SrvMaxConn 100
# allows keep-alive support till the server reaches 600 connections:
#QS_SrvMaxConnClose 600
# allows max 50 connections from a single ip address:
#QS_SrvMaxConnPerIP 50
</IfModule>- qos.conf 파일 편집(qos viewer 활성화)
sudo vim /etc/apache2/mods-available/qos.conf<IfModule qos_module>
# minimum request rate (bytes/sec at request reading):
QS_SrvRequestRate 120
# limits the connections for this virtual host:
QS_SrvMaxConn 100
# allows keep-alive support till the server reaches 600 connections:
QS_SrvMaxConnClose 600
# allows max 50 connections from a single ip address:
QS_SrvMaxConnPerIP 50
</IfModule>
# Status Viewer
<IfModule mod_qos.c>
<Location /qos>
SetHandler qos-viewer
</Location>
</IfModule>5. 웹 브라우저에서 확인
http://{server_ip}/qos/?option=ip&action=enable&refresh=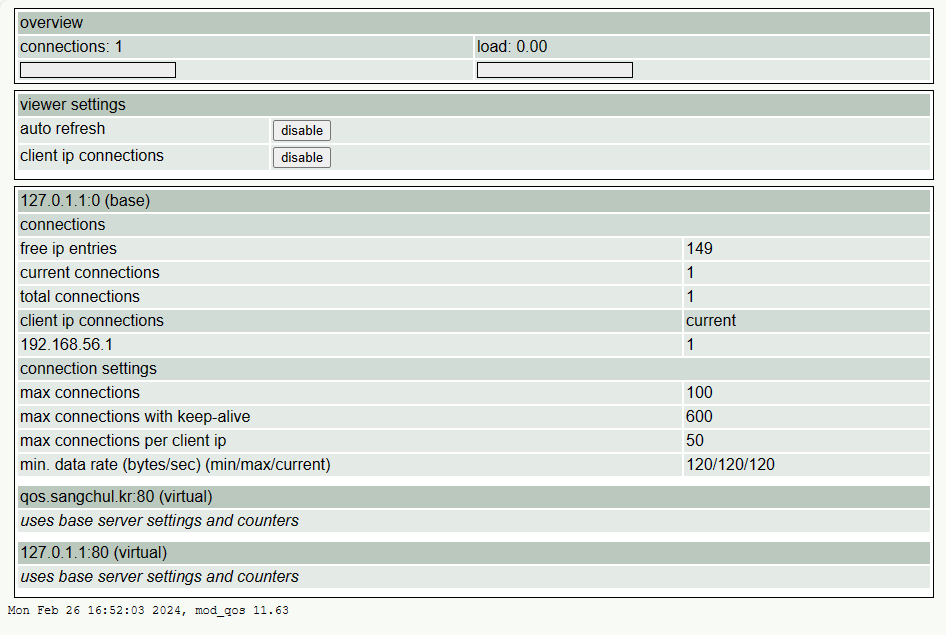
6. 테스트 및 디버깅
mod_qos가 올바르게 설치되었는지 확인하고 필요한 경우 설정을 조정합니다. 서버에 대한 요청을 테스트하여 제대로 작동하는지 확인하고 필요한 경우 로그를 확인하여 문제를 해결합니다.
이제 우분투에 mod_qos 모듈이 설치되었고 설정되었습니다. 이 모듈을 사용하여 Apache 웹 서버에서 트래픽을 제한하고 제어할 수 있습니다.
참고URL
- mod_qos : https://mod-qos.sourceforge.net/
728x90
'리눅스' 카테고리의 다른 글
| 리눅스 배포판(Linux Distros) (0) | 2024.02.28 |
|---|---|
| 우분투에 Nginx와 ModSecurity 모듈을 설치하고 OWASP를 적용하는 방법-edit (0) | 2024.02.26 |
| 우분투에 HAProxy를 설치하는 방법 (0) | 2024.02.23 |
| 우분투에서 Elasticsearch 8.x 설치 및 클러스터 구성 방법 (0) | 2024.02.22 |
| Kibana를 설치하고 구성하는 방법(SSL/TLS 암호화 구성) (0) | 2024.02.22 |


