우분투에서 Grafana, InfluxDB 2, Telegraf를 설치하고 구성하는 방법
- Grafana
- 역할 : Grafana는 데이터를 시각적으로 표현하고 대시보드를 만들기 위한 오픈 소스 시각화 및 모니터링 플랫폼입니다.
- 기능
- 다양한 데이터 소스로부터 데이터를 수집하고 시각적으로 표현할 수 있습니다.
- 대시보드를 구성하고 사용자 정의할 수 있으며, 시각적인 패널을 추가하여 데이터를 보기 쉽게 표현할 수 있습니다.
- 경고 및 알림 설정을 통해 시스템 상태의 변화를 감지하고 대응할 수 있습니다.
- InfluxDB
- 역할 : InfluxDB는 시계열 데이터베이스로서, 센서 데이터, 서버 로그, 성능 지표 등의 시계열 데이터를 저장하고 관리하는 역할을 합니다.
- 기능
- 시계열 데이터를 효율적으로 저장하고 쿼리할 수 있는 구조를 제공합니다.
- 데이터를 조직(Organization), 버킷(Bucket), 측정(Measurement) 등의 개념을 통해 계층적으로 관리합니다.
- InfluxDB Query Language (InfluxQL)를 사용하여 데이터를 검색하고 조작할 수 있습니다.
- Telegraf와 같은 데이터 수집 도구와 통합하여 데이터를 수집하고 저장할 수 있습니다.
- Telegraf
- 역할 : Telegraf는 다양한 종류의 시스템 및 서비스에서 성능 지표 및 이벤트 데이터를 수집하는 오픈 소스 플러그형 텔레메트리 에이전트입니다.
- 기능
- 다양한 입력 플러그인을 통해 여러 소스에서 데이터를 수집합니다. (예: CPU, 메모리, 디스크 사용량 등)
- 다양한 출력 플러그인을 통해 수집된 데이터를 여러 목적지로 전송합니다. (예: InfluxDB, Elasticsearch, Kafka 등)
- 수많은 플러그인을 지원하며, 확장이 용이하도록 설계되어 있습니다.
- 데이터를 여러 형식으로 변환하고 필터링하여 정교한 데이터 수집 및 전송을 지원합니다.
테스트 환경
- 운영체제 버전 확인
$ lsb_release -d
Description:    Ubuntu 22.04.3 LTS
1. InfluxDB 설치 및 구성
GPG 키 다운로드
wget -q https://repos.influxdata.com/influxdata-archive_compat.keyGPG 키 추가
echo '393e8779c89ac8d958f81f942f9ad7fb82a25e133faddaf92e15b16e6ac9ce4c influxdata-archive_compat.key' | sha256sum -c && cat influxdata-archive_compat.key | gpg --dearmor | sudo tee /etc/apt/trusted.gpg.d/influxdata-archive_compat.gpg > /dev/null$ echo '393e8779c89ac8d958f81f942f9ad7fb82a25e133faddaf92e15b16e6ac9ce4c influxdata-archive_compat.key' | sha256sum -c && cat influxdata-archive_compat.key | gpg --dearmor | sudo tee /etc/apt/trusted.gpg.d/influxdata-archive_compat.gpg > /dev/null
influxdata-archive_compat.key: OK리포지토리 추가
echo 'deb [signed-by=/etc/apt/trusted.gpg.d/influxdata-archive_compat.gpg] https://repos.influxdata.com/debian stable main' | sudo tee /etc/apt/sources.list.d/influxdata.list$ echo 'deb [signed-by=/etc/apt/trusted.gpg.d/influxdata-archive_compat.gpg] https://repos.influxdata.com/debian stable main' | sudo tee /etc/apt/sources.list.d/influxdata.list
deb [signed-by=/etc/apt/trusted.gpg.d/influxdata-archive_compat.gpg] https://repos.influxdata.com/debian stable mainAPT 패키지 목록 업데이트
sudo apt-get updateInfluxDB 패키지 설치
sudo apt-get install -y influxdb2$ sudo apt-get install influxdb2
Reading package lists... Done
Building dependency tree... Done
Reading state information... Done
The following additional packages will be installed:
influxdb2-cli
The following NEW packages will be installed:
influxdb2 influxdb2-cli
0 upgraded, 2 newly installed, 0 to remove and 4 not upgraded.
...InfluxDB 버전 확인
influxd version$ influxd version
InfluxDB v2.7.4 (git: 19e5c0e1b7) build_date: 2023-11-08T17:07:39ZInflux CLI 버전 확인
$ influx version
Influx CLI dev (git: none) build_date: 2023-04-28T14:24:14Z
InfluxDB 구성 파일 복사
sudo cp /etc/influxdb/config.toml /etc/influxdb/config.toml.originalInfluxDB 설정
vim /etc/influxdb/config.tomlbolt-path = "/var/lib/influxdb/influxd.bolt"
engine-path = "/var/lib/influxdb/engine"InfluxDB 시작
sudo systemctl start influxd---
$ sudo systemctl enable influxd
Failed to enable unit: Refusing to operate on alias name or linked unit file: influxd.service
$ ls -l /etc/systemd/system/influxd.service
lrwxrwxrwx 1 root root 36 Dec 4 20:29 /etc/systemd/system/influxd.service -> /lib/systemd/system/influxdb.service$ cat /lib/systemd/system/influxdb.service
# If you modify this, please also make sure to edit init.sh
[Unit]
Description=InfluxDB is an open-source, distributed, time series database
Documentation=https://docs.influxdata.com/influxdb/
After=network-online.target
[Service]
User=influxdb
Group=influxdb
LimitNOFILE=65536
EnvironmentFile=-/etc/default/influxdb2
ExecStart=/usr/lib/influxdb/scripts/influxd-systemd-start.sh
KillMode=control-group
Restart=on-failure
Type=forking
PIDFile=/var/lib/influxdb/influxd.pid
StateDirectory=influxdb
StateDirectoryMode=0750
LogsDirectory=influxdb
LogsDirectoryMode=0750
UMask=0027
TimeoutStartSec=0
[Install]
WantedBy=multi-user.target
Alias=influxd.service$ systemctl is-enabled influxd
alias---
InfluxDB 상태 확인
sudo systemctl status influxdsudo systemctl status influxd --no-pager -l웹 브라우저에서 접속
http://localhost:8086


INFLUXDB TOKEN 저장
export INFLUX_TOKEN="7_IXzQw=="echo $INFLUX_TOKEN$ echo $INFLUX_TOKEN
7_IXzQw==telegraf 조직(organization) 생성
influx org create -n telegraf-org --token $INFLUX_TOKEN$ influx org create -n telegraf-org --token $INFLUX_TOKEN
ID Name
d16e6c0c9b7f3278 telegraf-orginflux org list --token $INFLUX_TOKEN$ influx org list --token $INFLUX_TOKEN
ID Name
5aa3931338bb52b3 test-org
d16e6c0c9b7f3278 telegraf-orgtelegraf 버킷(Bucket) 생성
influx bucket create -n telegraf-bucket -o telegraf-org --token $INFLUX_TOKEN$ influx bucket create -n telegraf-bucket -o telegraf-org --token $INFLUX_TOKEN
ID Name Retention Shard group duration Organization ID Schema Type
1d6f328a01eef051 telegraf-bucket infinite 168h0m0s d16e6c0c9b7f3278 implicitinflux bucket list -o telegraf-org --token $INFLUX_TOKEN$ influx bucket list -o telegraf-org --token $INFLUX_TOKEN
ID Name Retention Shard group duration Organization ID Schema Type
e7bd4fb9a9fd6c30 _monitoring 168h0m0s 24h0m0s d16e6c0c9b7f3278 implicit
5bacb8c353c44da2 _tasks 72h0m0s 24h0m0s d16e6c0c9b7f3278 implicit
1d6f328a01eef051 telegraf-bucket infinite 168h0m0s d16e6c0c9b7f3278 implicittelegraf 사용자 생성
influx user create -n telegraf -p telegraf_password -o telegraf-org --token $INFLUX_TOKEN$ influx user create -n telegraf -p telegraf_password -o telegraf-org --token $INFLUX_TOKEN
ID Name
0c38c2e45e557000 telegraf권한 부여
- <조직_ID>에는 권한을 부여할 조직의 ID를, <사용자_ID>에는 권한을 부여할 사용자의 ID를 입력합니다.
- 권한 부여 명령에서 --read-buckets 및 --write-buckets는 버킷에 대한 읽기 및 쓰기 권한을 의미합니다.
influx auth create --read-buckets --write-buckets --org telegraf-org --user telegraf$ influx auth create --read-buckets --write-buckets --org telegraf-org --user telegraf
ID Description Token User Name User ID Permissions
0c3a6c4a8691f000 mIkmAw7oj5EgznHXXMXdVt_Izv6yncByRUbMMVEjsj_J6kmQ8kLT6IT5oo5158lgtm8H9DC5YTs0cV3mRaggbQ== telegraf 0c392935ed51f000 [read:orgs/354a47fa3c9d3551/buckets write:orgs/354a47fa3c9d3551/buckets]권한 부여 확인
influx auth list
2. Telegraf 설치 및 구성
GPG 키 다운로드 및 리포지토리 추가
---
wget -q https://repos.influxdata.com/influxdata-archive_compat.keyecho '393e8779c89ac8d958f81f942f9ad7fb82a25e133faddaf92e15b16e6ac9ce4c influxdata-archive_compat.key' | sha256sum -c && cat influxdata-archive_compat.key | gpg --dearmor | sudo tee /etc/apt/trusted.gpg.d/influxdata-archive_compat.gpg > /dev/null$ echo '393e8779c89ac8d958f81f942f9ad7fb82a25e133faddaf92e15b16e6ac9ce4c influxdata-archive_compat.key' | sha256sum -c && cat influxdata-archive_compat.key | gpg --dearmor | sudo tee /etc/apt/trusted.gpg.d/influxdata-archive_compat.gpg > /dev/null
influxdata-archive_compat.key: OKecho 'deb [signed-by=/etc/apt/trusted.gpg.d/influxdata-archive_compat.gpg] https://repos.influxdata.com/debian stable main' | sudo tee /etc/apt/sources.list.d/influxdata.list$ echo 'deb [signed-by=/etc/apt/trusted.gpg.d/influxdata-archive_compat.gpg] https://repos.influxdata.com/debian stable main' | sudo tee /etc/apt/sources.list.d/influxdata.list
deb [signed-by=/etc/apt/trusted.gpg.d/influxdata-archive_compat.gpg] https://repos.influxdata.com/debian stable main---
APT 패키지 목록 업데이트
sudo apt-get updateTelegraf 패키지 설치
sudo apt-get install -y telegrafTelegraf 버전 확인
telegraf version$ telegraf version
Telegraf 1.28.5 (git: HEAD@77e1a498)Telegraf 구성 파일 복사
sudo cp /etc/telegraf/telegraf.conf /etc/telegraf/telegraf.conf.originalTelegraf 구성 파일 편집
sudo vim /etc/telegraf/telegraf.conf- urls : http://localhost:8086
- token : influxdb-token
- organization : telegraf-org
- bucket : telegraf-bucket
[[outputs.influxdb_v2]]
  urls = ["http://localhost:8086"]
  token = "your-influxdb-token"
  organization = "your-organization"
  bucket = "your-bucket"
colordiff /etc/telegraf/telegraf.conf.original /etc/telegraf/telegraf.confdiff -Nur /etc/telegraf/telegraf.conf.original /etc/telegraf/telegraf.conf$ diff -Nur /etc/telegraf/telegraf.conf.original /etc/telegraf/telegraf.conf
--- /etc/telegraf/telegraf.conf.original 2023-12-04 11:08:55.107001412 +0900
+++ /etc/telegraf/telegraf.conf 2023-12-04 11:10:41.045902208 +0900
@@ -319,22 +319,22 @@
# # Configuration for sending metrics to InfluxDB 2.0
-# [[outputs.influxdb_v2]]
+[[outputs.influxdb_v2]]
# ## The URLs of the InfluxDB cluster nodes.
# ##
# ## Multiple URLs can be specified for a single cluster, only ONE of the
# ## urls will be written to each interval.
# ## ex: urls = ["https://us-west-2-1.aws.cloud2.influxdata.com"]
-# urls = ["http://127.0.0.1:8086"]
+ urls = ["http://127.0.0.1:8086"]
#
# ## Token for authentication.
-# token = ""
+ token = "7_IXzQw=="
#
# ## Organization is the name of the organization you wish to write to.
-# organization = ""
+ organization = "telegraf-org"
#
# ## Destination bucket to write into.
-# bucket = ""
+ bucket = "telegraf-org"
#
# ## The value of this tag will be used to determine the bucket. If this
# ## tag is not set the 'bucket' option is used as the default.Telegraf 서비스 시작
sudo systemctl start telegrafTelegraf 서비스 부팅 시 자동 시작 설정(활성화)
sudo systemctl enable telegrafTelegraf 서비스 상태 확인
sudo systemctl status telegrafsudo systemctl status telegraf --no-pager -l3. Grafana 설치 및 구성
필수 패키지 설치
sudo apt-get install -y apt-transport-https software-properties-common wgetGPG 키 다운로드 및 추가
sudo mkdir -p /etc/apt/keyrings/wget -q -O - https://apt.grafana.com/gpg.key | gpg --dearmor | sudo tee /etc/apt/keyrings/grafana.gpg > /dev/null리포지토리 추가
echo "deb [signed-by=/etc/apt/keyrings/grafana.gpg] https://apt.grafana.com stable main" | sudo tee -a /etc/apt/sources.list.d/grafana.list$ echo "deb [signed-by=/etc/apt/keyrings/grafana.gpg] https://apt.grafana.com stable main" | sudo tee -a /etc/apt/sources.list.d/grafana.list
deb [signed-by=/etc/apt/keyrings/grafana.gpg] https://apt.grafana.com stable mainAPT 패키지 목록 업데이트
sudo apt-get updateGrafana OSS 패키지 설치
sudo apt-get install -y grafanaGrafana 버전 확인
grafana-cli --version$ grafana-cli --version
grafana version 10.2.2Grafana 구성 파일 복사
sudo cp /etc/grafana/grafana.ini /etc/grafana/grafana.ini.originalGrafana 서비스 시작
sudo systemctl start grafana-serverGrafana 서비스 부팅 시 자동 시작 설정(활성화)
sudo systemctl enable grafana-serverGrafana 서비스 상태 확인
sudo systemctl status grafana-serversudo systemctl status grafana-server --no-pager -l웹 브라우저에서 접속
http://localhost:3000- Email : admin
- Password : admin


4. Grafana에서 데이터 소스를 구성하고 대시보드를 만들기
4-1 Grafana 웹 브라우저에서 접속
- 기본 로그인은 admin/admin입니다.
http://localhost:30004-2 좌측 사이드바에서 "Configurations" 섹션으로 이동하고 "Data Sources"를 선택합니다.

4-3 "Add your first data source"를 선택하고 InfluxDB를 선택합니다. 필요한 정보를 기입하고 "Save & Test" 버튼을 클릭합니다.
- HTTP
- URL : http://127.0.0.1:8086
- InfluxDB Details
- Organization : telegraf-org
- Token : ys==
- Default Bucket : telegraf-bucket

4-4 이제 대시보드를 만들고 그라파나에서 InfluxDB 2 데이터를 시각화할 수 있습니다.
- 대시보드 생성
- 좌측 사이드바에서 "+" 버튼을 클릭하여 새로운 대시보드를 생성합니다.
- 패널 추가
- 대시보드에서 "+" 버튼을 클릭하여 패널을 추가합니다.
- 데이터 소스 선택
- 패널의 설정에서 "Data Source" 탭에서 방금 구성한 InfluxDB 데이터 소스를 선택합니다.
- 쿼리 설정
- "Metrics" 탭에서 쿼리를 입력하고 시각화 옵션을 설정합니다. Flux 쿼리 언어를 사용하며, 데이터베이스와 데이터 측정(Measurement)를 선택하고 필요에 따라 쿼리를 작성합니다.
- 시각화 탭 설정
- "Visualization" 탭에서 그래프 유형, 색상, 레전드 등의 시각화 옵션을 설정합니다.
- 대시보드 저장
- 설정이 완료되면 패널 및 대시보드 설정을 저장합니다.
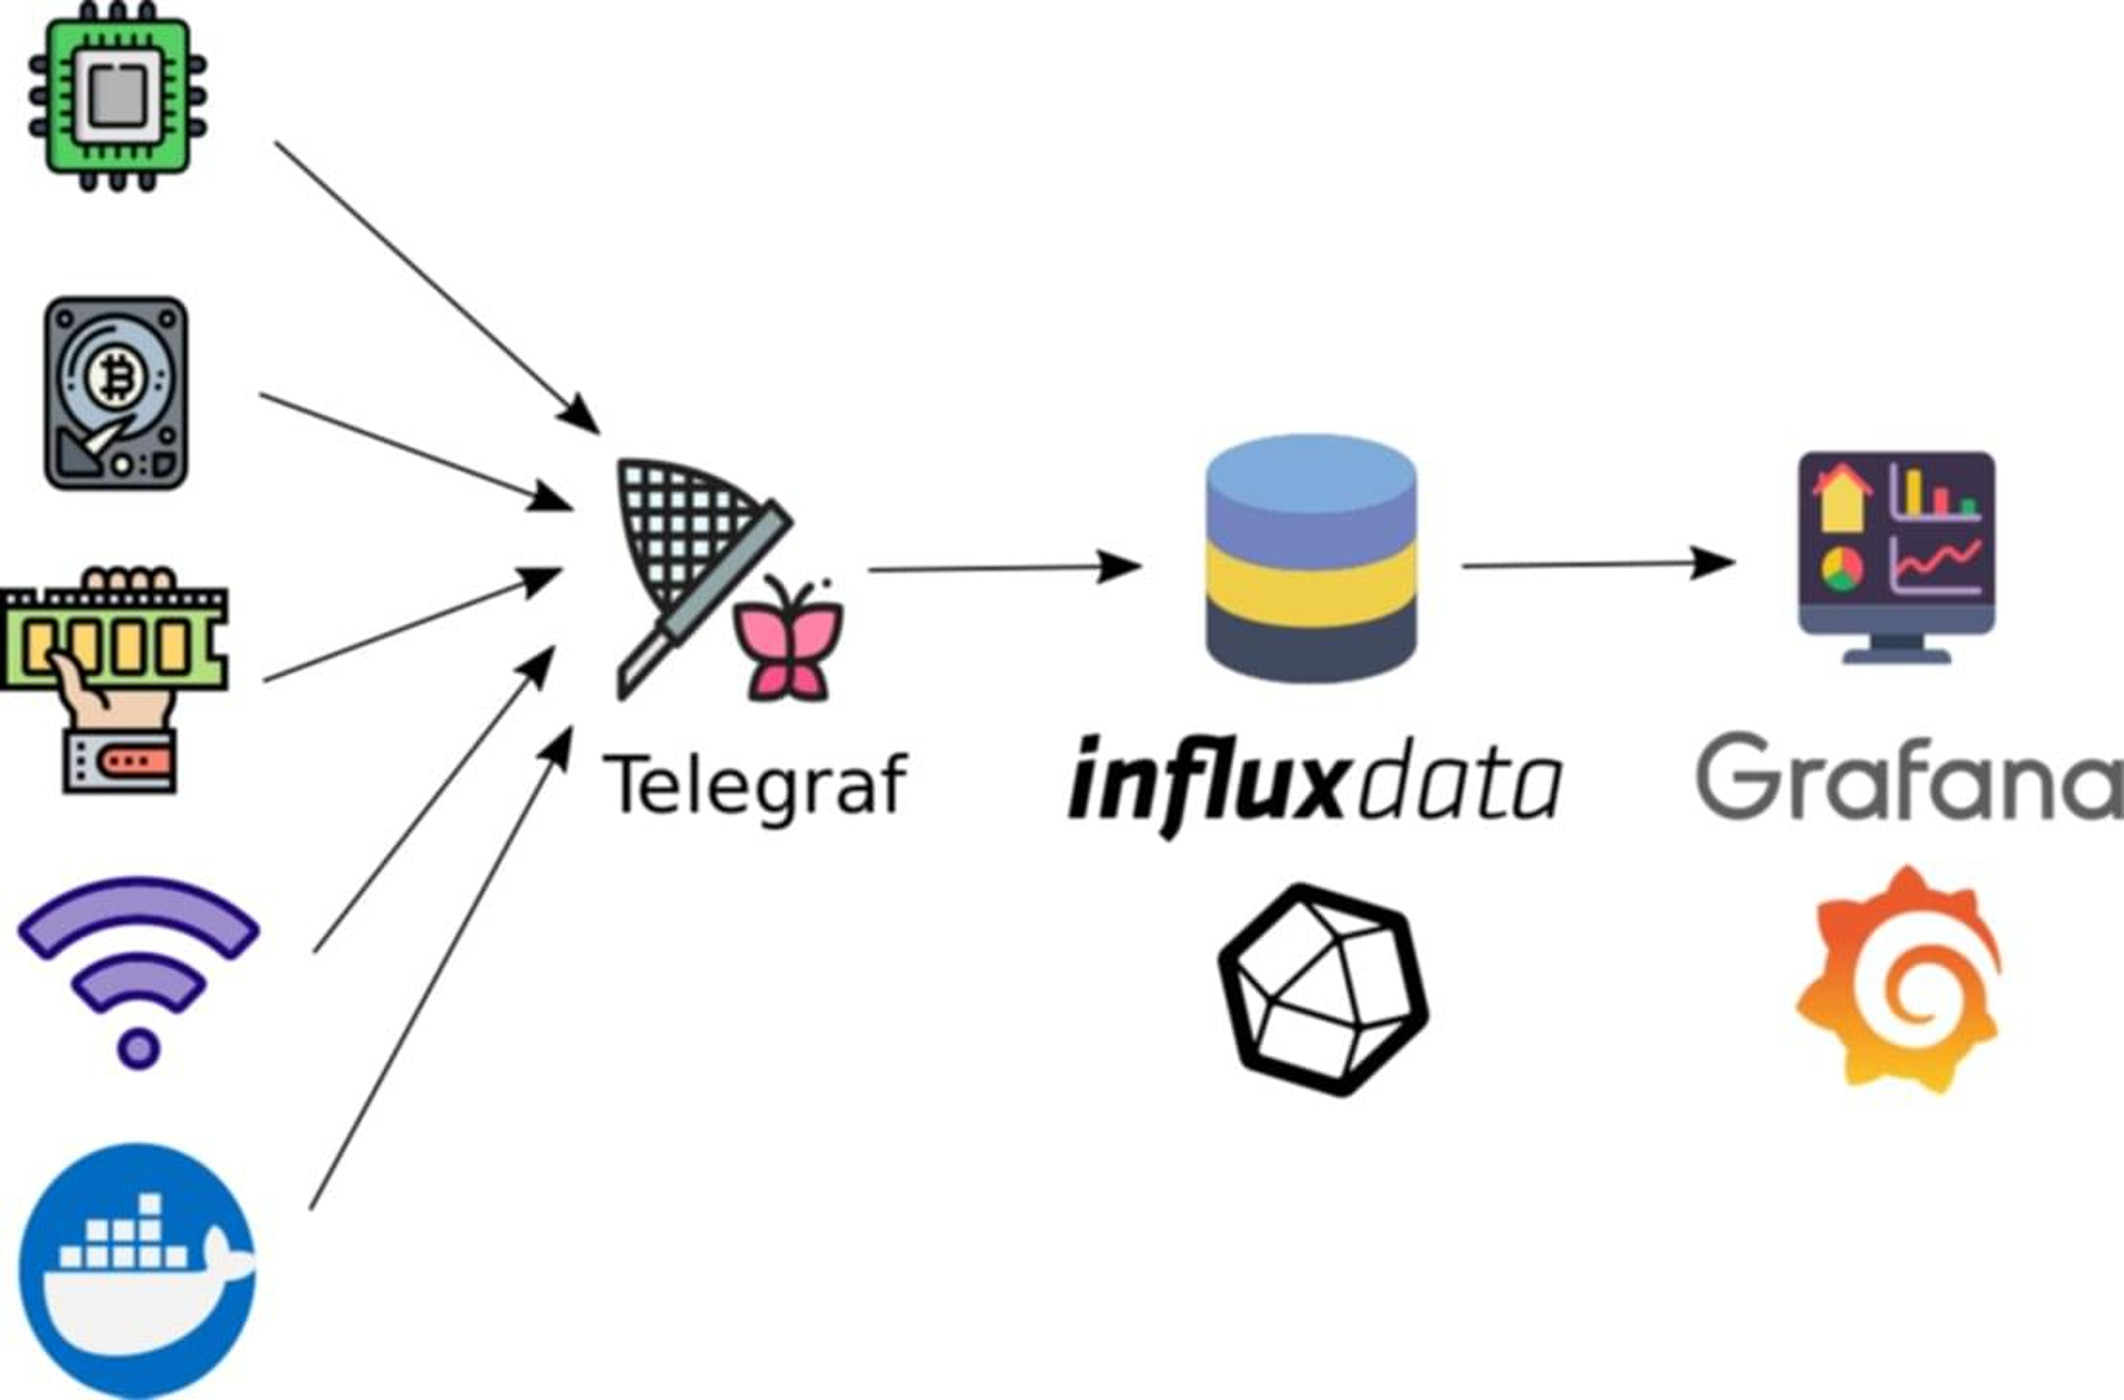
이제 InfluxDB에 Telegraf로부터 데이터가 수집되고 그 데이터를 Grafana에서 시각화할 수 있게 됩니다.
참고URL
- InfluxData Downloads https://www.influxdata.com/downloads/
- Install InfluxDB : https://docs.influxdata.com/influxdb/v2/install/
- Install Telegraf : https://docs.influxdata.com/telegraf/v1/install/
- Install Grafana on Ubuntu : https://grafana.com/docs/grafana/latest/setup-grafana/installation/debian/
'리눅스' 카테고리의 다른 글
| Grafana 대시보드를 가져오는 방법(Import dashboard) (0) | 2023.12.05 |
|---|---|
| [draft] 우분투에 Prometheus와 Grafana 그리고 Node Exporter를 설치하고 구성하는 방법 (0) | 2023.12.04 |
| 우분투에서 lsyncd를 사용하여 디렉토리 간에 변경 사항을 실시간으로 동기화하는 방법 (0) | 2023.12.01 |
| 리눅스에서 ulimit을 설정하는 방법 (0) | 2023.11.30 |
| 웹 서버의 성능을 향상시키기 위한 커널 파라미터 튜닝하는 방법 (0) | 2023.11.30 |


