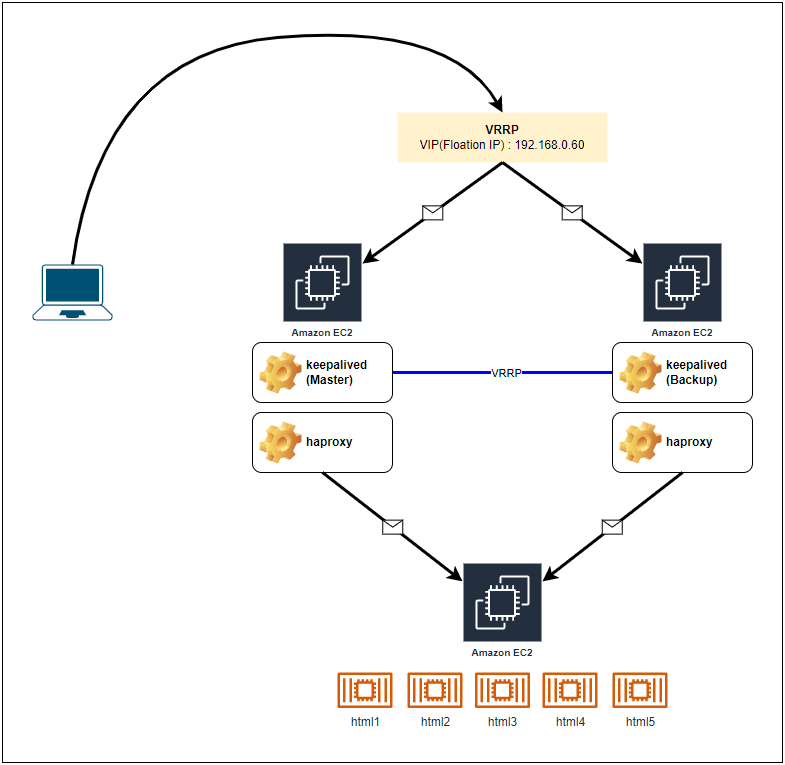
keepalived, haproxy 설치 및 설정하기
- keepalived : LVS 클러스터용 장애 조치 및 모니터링 데몬
- haproxy : 빠르고 안정적인 로드 밸런싱 리버스 프록시
테스트 환경

| 호스트이름 | 아이피 | 운영체제 | 비고 |
| node2 | 192.168.0.62 | CentOS 7.9 | |
| node3 | 192.168.0.63 | Ubuntu 22.04 | |
| node1 | 192.168.0.61 | Ubuntu 22.04 | 웹서버 도커 컨테이너로 구성 |
** VIP : 192.168.0.60
커널 파라미터 설정
커널 파라미터 확인
sysctl -a | egrep 'net.ipv4.ip_forward|net.ipv4.ip_nonlocal_bind'- centos
$ sysctl -a | egrep 'net.ipv4.ip_forward|net.ipv4.ip_nonlocal_bind'
net.ipv4.ip_forward = 0
net.ipv4.ip_forward_use_pmtu = 0
net.ipv4.ip_nonlocal_bind = 0- ubuntu
$ sysctl -a | egrep 'net.ipv4.ip_forward|net.ipv4.ip_nonlocal_bind'
net.ipv4.ip_forward = 1
net.ipv4.ip_forward_update_priority = 1
net.ipv4.ip_forward_use_pmtu = 0
net.ipv4.ip_nonlocal_bind = 0
kernel 파라미터 값 변경
echo "net.ipv4.ip_forward = 1" >> /etc/sysctl.confecho "net.ipv4.ip_nonlocal_bind = 1" >> /etc/sysctl.confsysctl -p | egrep 'net.ipv4.ip_forward|net.ipv4.ip_nonlocal_bind'$ sysctl -p | egrep 'net.ipv4.ip_forward|net.ipv4.ip_nonlocal_bind'
net.ipv4.ip_forward = 1
net.ipv4.ip_nonlocal_bind = 1keepalived, haproxy 설치 및 구성
keepalived, haproxy 설치
- centos
yum install -y kernel-headers kernel-develkeepalived 패키지 설치
yum install -y keepalived$ keepalived --version
Keepalived v1.3.5 (03/19,2017), git commit v1.3.5-6-g6fa32f2
Copyright(C) 2001-2017 Alexandre Cassen, <acassen@gmail.com>
Build options: PIPE2 LIBNL3 RTA_ENCAP RTA_EXPIRES RTA_PREF RTA_VIA FRA_OIFNAME FRA_SUPPRESS_PREFIXLEN FRA_TUN_ID RTAX_CC_ALGO RTAX_QUICKACK LIBIPTC LIBIPSET_DYNAMIC LVS LIBIPVS_NETLINK VRRP VRRP_AUTH VRRP_VMAC SOCK_NONBLOCK SOCK_CLOEXEC FIB_ROUTING INET6_ADDR_GEN_MODE SNMP_V3_FOR_V2 SNMP SNMP_KEEPALIVED SNMP_CHECKER SNMP_RFC SNMP_RFCV2 SNMP_RFCV3 SO_MARKkeepalived 활성화 및 시작
systemctl --now enable keepalivedhaproxy 패키지 설치
yum install -y haproxy$ haproxy -v
HA-Proxy version 1.5.18 2016/05/10
Copyright 2000-2016 Willy Tarreau <willy@haproxy.org>haproxy 활성화 및 시작
systemctl --now enable haproxy- ubuntu
apt-get install -y linux-headers-$(uname -r)keepalived 패키지 설치
apt-get install -y keepalived$ keepalived --version
Keepalived v2.2.4 (08/21,2021)
Copyright(C) 2001-2021 Alexandre Cassen, <acassen@gmail.com>
Built with kernel headers for Linux 5.15.27
Running on Linux 5.15.0-58-generic #64-Ubuntu SMP Thu Jan 5 11:43:13 UTC 2023
Distro: Ubuntu 22.04.1 LTS
configure options: --build=x86_64-linux-gnu --prefix=/usr --includedir=${prefix}/include --mandir=${prefix}/share/man --infodir=${prefix}/share/info --sysconfdir=/etc --localstatedir=/var --disable-option-checking --disable-silent-rules --libdir=${prefix}/lib/x86_64-linux-gnu --runstatedir=/run --disable-maintainer-mode --disable-dependency-tracking --enable-snmp --enable-sha1 --enable-snmp-rfcv2 --enable-snmp-rfcv3 --enable-dbus --enable-json --enable-bfd --enable-regex --with-init=systemd build_alias=x86_64-linux-gnu CFLAGS=-g -O2 -ffile-prefix-map=/build/keepalived-NeItXh/keepalived-2.2.4=. -flto=auto -ffat-lto-objects -flto=auto -ffat-lto-objects -fstack-protector-strong -Wformat -Werror=format-security LDFLAGS=-Wl,-Bsymbolic-functions -flto=auto -ffat-lto-objects -flto=auto -Wl,-z,relro CPPFLAGS=-Wdate-time -D_FORTIFY_SOURCE=2
Config options: NFTABLES LVS REGEX VRRP VRRP_AUTH VRRP_VMAC JSON BFD OLD_CHKSUM_COMPAT SNMP_V3_FOR_V2 SNMP_VRRP SNMP_CHECKER SNMP_RFCV2 SNMP_RFCV3 DBUS INIT=systemd SYSTEMD_NOTIFY
System options: VSYSLOG MEMFD_CREATE IPV4_DEVCONF LIBNL3 RTA_ENCAP RTA_EXPIRES RTA_NEWDST RTA_PREF FRA_SUPPRESS_PREFIXLEN FRA_SUPPRESS_IFGROUP FRA_TUN_ID RTAX_CC_ALGO RTAX_QUICKACK RTEXT_FILTER_SKIP_STATS FRA_L3MDEV FRA_UID_RANGE RTAX_FASTOPEN_NO_COOKIE RTA_VIA FRA_PROTOCOL FRA_IP_PROTO FRA_SPORT_RANGE FRA_DPORT_RANGE RTA_TTL_PROPAGATE IFA_FLAGS LWTUNNEL_ENCAP_MPLS LWTUNNEL_ENCAP_ILA NET_LINUX_IF_H_COLLISION LIBIPVS_NETLINK IPVS_DEST_ATTR_ADDR_FAMILY IPVS_SYNCD_ATTRIBUTES IPVS_64BIT_STATS IPVS_TUN_TYPE IPVS_TUN_CSUM IPVS_TUN_GRE VRRP_IPVLAN IFLA_LINK_NETNSID GLOB_BRACE GLOB_ALTDIRFUNC INET6_ADDR_GEN_MODE VRF SO_MARKkeepalived 활성화 및 시작
systemctl --now enable keepalivedhaproxy 패키지 설치
apt-get install -y haproxy$ haproxy -v
HAProxy version 2.4.18-0ubuntu1 2022/08/25 - https://haproxy.org/
Status: long-term supported branch - will stop receiving fixes around Q2 2026.
Known bugs: http://www.haproxy.org/bugs/bugs-2.4.18.html
Running on: Linux 5.15.0-58-generic #64-Ubuntu SMP Thu Jan 5 11:43:13 UTC 2023 x86_64haproxy 활성화 및 시작
systemctl --now enable haproxykeepalived 구성
keepalived 설정 파일
vim /etc/keepalived/keepalived.confnode2
- state MASTER
- priority 101
###haproxy가 여전히 작동하는지 확인하는데 사용되는 스크립트 정의

vrrp_script chk_haproxy {
  script "killall -0 haproxy"
  interval 2
  weight 2
}
###가상 인터페이스 구성
vrrp_instance VI_1 {
  interface enp0s3
  state MASTER
  virtual_router_id 51
  priority 101
  virtual_ipaddress {
    192.168.0.60
  }
  track_script {
    chk_haproxy
  }
}
node3
- state BACKUP
- priority 100
###haproxy가 여전히 작동하는지 확인하는데 사용되는 스크립트 정의
vrrp_script chk_haproxy {
  script "killall -0 haproxy"
  interval 2
  weight 2
}

###가상 인터페이스 구성
vrrp_instance VI_1 {
  interface enp0s3
  state BACKUP
  virtual_router_id 51
  priority 100
  virtual_ipaddress {
    192.168.0.60
  }
  track_script {
    chk_haproxy
  }
}
keepalived 재시작
systemctl restart keepalivedhaproxy 구성
haproxy 설정 파일
vim /etc/haproxy/haproxy.cfgnode2, node3
#---------------------------------------------------------------------
# main frontend which proxys to the backends
#---------------------------------------------------------------------
frontend http-in
    bind *:80
    option              forwardfor
    default_backend     backend_app1_server

#---------------------------------------------------------------------
# round robin balancing between the various backends
#---------------------------------------------------------------------
backend backend_app1_server
    balance     roundrobin
    server  html1 192.168.0.61:8081 check
    server  html2 192.168.0.61:8082 check
    server  html3 192.168.0.61:8083 check
    server  html4 192.168.0.61:8084 check
    server  html5 192.168.0.61:8085 check

#---------------------------------------------------------------------
# haproxy statistics
#---------------------------------------------------------------------
listen stats
    bind :8080
    stats enable
    stats uri /
    stats hide-version
    stats auth admin:admin
    default_backend backend_app1_server
haproxy -c -f /etc/haproxy/haproxy.cfghaproxy 재시작
systemctl restart haproxy웹서버 확인(node1)
$ docker-compose ps
Name               Command               State                  Ports
-------------------------------------------------------------------------------------
html1   /docker-entrypoint.sh ngin ...   Up      0.0.0.0:8081->80/tcp,:::8081->80/tcp
html2   /docker-entrypoint.sh ngin ...   Up      0.0.0.0:8082->80/tcp,:::8082->80/tcp
html3   /docker-entrypoint.sh ngin ...   Up      0.0.0.0:8083->80/tcp,:::8083->80/tcp
html4   /docker-entrypoint.sh ngin ...   Up      0.0.0.0:8084->80/tcp,:::8084->80/tcp
html5   /docker-entrypoint.sh ngin ...   Up      0.0.0.0:8085->80/tcp,:::8085->80/tcp
ip, vip 확인
ip add show enp0s3ip --brief add| node | IP |
| node2 |
$ ip add show enp0s3 | grep -v inet6 | egrep inet inet 192.168.0.62/24 brd 192.168.0.255 scope global noprefixroute enp0s3 inet 192.168.0.60/32 scope global enp0s3 |
| $ ip --brief add lo UNKNOWN 127.0.0.1/8 ::1/128 enp0s3 UP 192.168.0.62/24 192.168.0.60/32 fe80::812d:fb4:4b81:82c5/64 |
|
| node3 |
$ ip add show enp0s3 | grep -v inet6 | egrep inet inet 192.168.0.63/24 brd 192.168.0.255 scope global enp0s3 |
| $ ip --brief add lo UNKNOWN 127.0.0.1/8 ::1/128 enp0s3 UP 192.168.0.63/24 fe80::a00:27ff:fe0b:4803/64 |
참고URL
- L4/L7 스위치의 대안, 오픈 소스 로드 밸런서 HAProxy : https://d2.naver.com/helloworld/284659
- cloud.redhat.com : Keeping your OpenShift Container Platform HAproxy Highly Available with Keepalived
- access.redhat.com : HAProxy/keepalived Configuration
우분투
'리눅스' 카테고리의 다른 글
| [draft] 우분투에서 Gradle을 설치하는 방법 (0) | 2025.11.11 |
|---|---|
| [draft] MySQL에서 특정 사용자가 특정 외부 IP 주소에서만 접속할 수 있도록 설정하는 방법 (0) | 2025.11.11 |
| [draft] vscode unins000.exe 액세스 거부 오류 (0) | 2025.11.11 |
| [draft] SSL 인증서와 개인 키를 하나의 파일로 합치는 방법 (0) | 2025.11.11 |
| [draft] Serverless Framework를 사용하여 서버리스 애플리케이션을 만드는 방법 (0) | 2025.11.07 |


